Drama llama and her mama DIY felt ornament

4 Nov

diy llama ornament One of the best ways to create with felt is making felt Christmas ornaments.

Every year I make ornaments for friends and family that reflect aspects of their lives or personalities. This drama llama and her mama was created for a dear friend who is raising an amazing free spirited little diva. Mama llama looks serene even dealing with the antics of little llama who is dressed to impress.

I cannot encourage you enough to consider handcrafting a heirloom ornament for the people you love. Its so much more than a gift its years and years of memories and love across time and distance. Starting early is key to insuring you have time to create something special and unique for everyone you love. This llama ornament has a blank back side that can be used to add names or the year. On the chance that you or someone know someone who would love a little llama drama. I’ve shared the full DIY pattern and tutorial for these adorable felt llama ornaments below.

30You will need:

9″ x 7″ Light blue felt – Sparrow *

5″ x 7″ White fur felt*

3″ x 3″ felt scrap in Cream*, Blue – Aqua*, Pale Orange – Orange Whip*

Embroidery thread in, Coral, aqua, pink, bronze or gold for hooves, apple green, black, dark teal

1 cupped flower sequin (optional)

6″ cording or ribbon for hanging

Leather punch or hole punch for thick materials

Felt drama llama ornament pattern: Llama PDF

*Matching thread color

Cut:

From pale blue felt: 2 Ovals

From white fur felt: 1 drama llama and 1 mama llama

From cream felt: 1 each of llama faces

From aqua felt: 1 neck strap, 1 medium mama blanket and 1 medium little llama blanket

From orange felt: 1 large mama blanket and 1 small little llama blanket

From pink felt: 1 small mama blanket and 1 large little llama blanket.

3

Sew llamas to one of the ovals as shown. Add faces from cream felt.

5

Place neck strap down and stitch down with pink embroidery thread in v shapes.

9

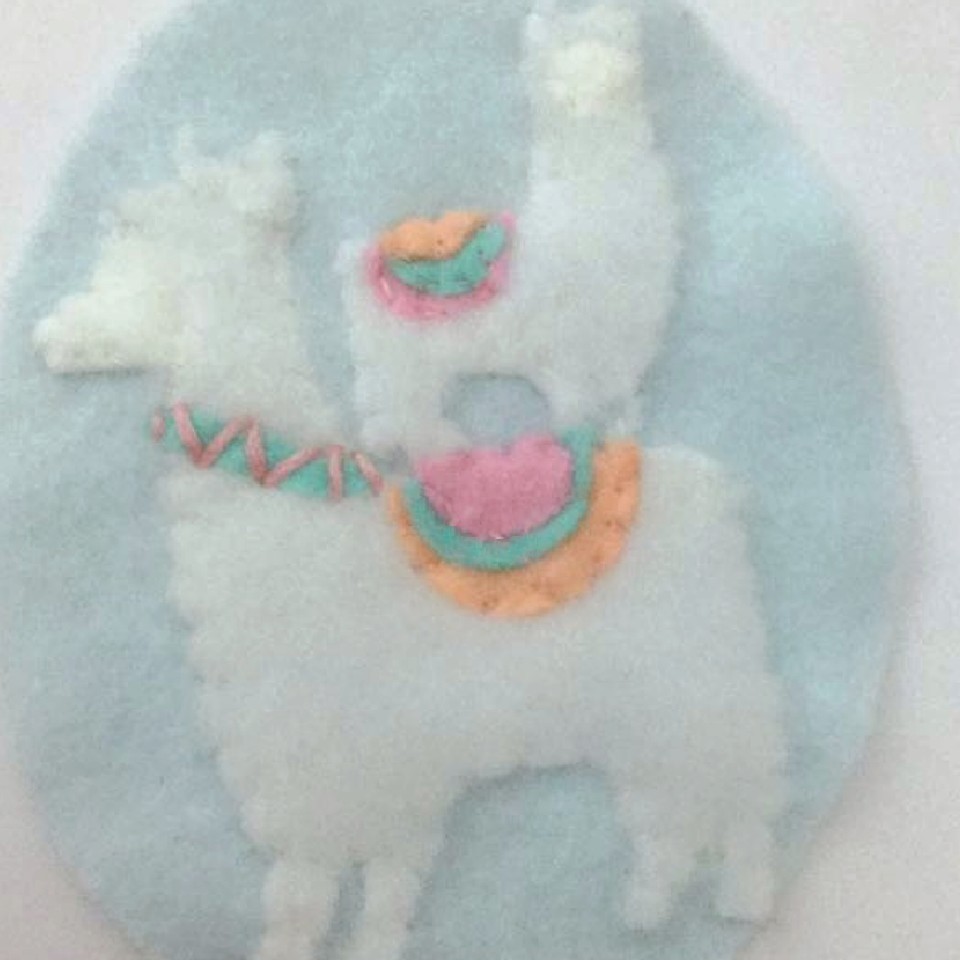
Stack llama blankets as shown and sew into place.

10

With a single strand of black thread doubled over stitch llama faces.

Add knot details along strap as shown with green thread. Add french knots along little blankets and along the neck and head of little llama. Add pink french knots along neck and small stitches around the head of the smaller llama. Repeat with teal and coral thread.

desvibe


11


With single length of coral thread add stitches along top of strap and with a double length add french knots along mama llama blanket.

With a single strand of black thread doubled over stitch llama ears.

With bronze thread add satin stitches along hooves of llamas.

Add sequin flower if desired

18Overcast stitch the ovals together with matching thread. If you are using a weak hole punch punch the pieces separately before sewing together or sew cord to top.

23

Punch a hole through ornament.

26Sew around hole to hold and add a cord to hang.

30

27

Happy Crafting

~Andie

You may also like

DIY felt ornaments

DIY felt Yeti Ornament

DIY felt seashells free pattern and tutorial

Felt Shell Ornaments 

20915449_10214172423608244_2070013955218399073_nMagic Snow globe ornaments.

14 craft projects for felt prints.

16 Sep
Who among us hasn’t seen a felt print we couldnt live without and thrown caution to the wind only to find themselves later wondering, ” What can I make with felt prints?”

Cast your worries aside because here are 14 free projects geared toward printed felt. When crafting with felt prints you will want to consider the size of the print in order to showcase your prints properly. And when mixing prints try to match either color or scale so the pieces all come together. Read on for 14 easy free felt projects perfect for showcasing your printed felt .

  1. Bunny Hoops – the inner of these bunny hoops feature some fun spring prints, felt prints are especially fun when used for unexpected detail areas.

2. Bean Bags – Simple and striking making felt bean bags lets your favorite felt print really shine.

Felt Bean bag tutorial - super easy.

3. Play Bandages – A touch of hook and loop makes these re-useable felt bandages a fun addition to any play doctors kit. Using printed felt ups the fun factor even more.

4. Felt Heart Ornaments – These felt heart ornaments are great for any size felt print and are as simple to sew as they are cute.

5. Garland – Try using your favorite printed felt in silhouettes for the season. These bunnies feature beautiful floral prints

6. Mug Ornaments – Abstract designs take on even more dramatic role when used in these fun mug ornaments.

7. Faux Potted Plant – Use your favorite felt print to create a little plant friend. This pattern features three different succulents and can be easily sized up or down.

8. Birthday Blocks – Use your felt print to stitch up a soft gift block for a soft sweet reminder of a great celebration.

9. Sloth Stocking – Printed felt looks great when used for accents like the stocking holding this felt sloth.

10. Llama blanket – Consider customizing your llama with a printed felt blanket instead of the valentine theme.

11. Felt ball – Felt balls in various patterns would be a patchwork dream come true. Learn all the steps to make them using this free pattern.

12. Doggie Pillows – This no sew pillow project would look great in a print.

13. Tic Tac Toe Board – Here giraffe felt print takes center stage but this project could be created with an initial or symbol of any kind.

DIY Felt Giraffe Tic Tac Toe Tutorial

14. Sachet – Be greeted every morning by your favorite felt print livening up your dresser drawers, these felt drawer sachets are super simple and would look great when made with a patterned felt.

Nearly any project be accented with a printed felt. Using felt prints adds an unexpected detail to felt crafts and allows just a touch more personalization. Need more inspiration to get your creative juices flowing?

Check out our huge selection of felt prints.

DIY Felt Food Pancakes / Flapjacks

15 Sep
Pancakes, Hotcakes or flapjacks whatever you call them these breakfast champs are the stuff weekend and birthday breakfasts are made of. Now you can whip up a batch of DIY felt pancakes in practically no time with this free felt food pattern and tutorial. Our felt food pattern features three sizes of stack able hotcakes and syrup with melting butter perfect play food for any kid’s kitchen.

You will need:

For 3 flapjacks

1/4 yard pale dough color felt, Almond *

9″ x 12″ sheet pale tan felt, Peanut Butter *

9″ x 12″ sheet or scrap felt for syrup, Tree Bark

Scrap felt for butter, Buttercream * .

Felt Food Pattern

*Matching thread

Cut

2 of each size felt pancake inside from Almond felt

2 of each size pancake outside from Peanut Butter felt

1 syrup puddle from amber color

1 butter from pale yellow felt

Sew same size felt pancakes by sewing a small running stitch around the outside, leave 1″ to turn. Turn right side out and stitch together.

Stitch pancake outside to each side with an applique stitch and matching thread.

Now that you’ve made a big stack of fluffy felt flapjacks you’ll need some syrup.

Applique stitch butter to syrup.

Happy Crafting

~Andie

Complete your breakfast with these fun felt food patterns:

Snack Cakes Free Felt Food Pattern

7 Sep
Free Pattern for making felt food snack cakes.

I’ll own up to the fact that the sight of these individual chocolate cakes makes me nostalgic for a noisy school cafeteria where friendships are cemented and the real power trades are made. These sweet chocolate were the king of the cafeteria!

I present to you a felt food pattern to make easy DIY snack cakes you won’t have to trade your fruit roll and chocolate milk to get.

You will need:

9″ x 12″ sheet brown felt – Chocolate *

1/2 yard white ric rac or 5″ x 5″ white felt cut to shape *

Stuffing, foam or scrap felt to fill

. *Matching thread

makes 3

For each cake cut:

2 top/bottom pieces and one side from brown felt

4″ length of ric rac

Sew ric rac to the center of cake top with white thread and a running stitch.

Sew side to front along the curve with brown thread and an overcast stitch. Tuck ric rac edges inside and sew until top is fully connected. Trim any access felt and sew short sides of side together.

Stuff until full but do not over stuff or the top will become rounded.

Sew bottom into place with an overcast stitch and matching thread.

And that’s all it takes to become king of the cafeteria.

Easily worth TWO pudding cups.

Happy Crafting

~Andie

You might also enjoy :