Crafter’s Block? Here are 5 Great Ideas For Your Felt

11 May

Crafter’s block can be a frustrating and debilitating experience for crafters of all levels. Whether you’re a seasoned crafter or a beginner, there are times when the ideas for what to create and for what purpose just won’t come to you.

Fortunately, there are many strategies you can use to overcome crafter’s block and get back to creating! In this list, we’ll explore some things to create and alleviate your crafter’s block and keep your crafting on track.

These fun projects could help you stay productive and creative. So if you’re struggling with crafter’s block, read on to learn how to break through and keep crafting!

1. Felt Food: Felt food projects are just the thing to inspire imaginative play and practice manners and fine motor skills too! Our Chicken Nuggies tutorial is just the thing to get the sauces flowing.

This sweet little DIY chicken nuggets play set will create 7 fun felt food chicken nuggets, a cheerfully detailed felt chicken nugget box, and delightful dipping sauce cup.

American Felt and Craft – DIY Felt Food Chicken Nuggets Playset

2. Costumes: Felt is a popular material for making costumes, especially for Halloween. It can be easily cut and sewn to create a variety of fun and unique costume designs. These little felt shoes are a cute addition to a baby costume.

Little feet are just the cutest things ever, keep those teeny tootsies toasty with some DIY felt baby booties. These hand sewn baby booties are super simple to make with the free pattern below. 

American Felt and Craft – Felt Baby Booties

3. Puppets: Felt puppets are a fun and creative way for children to play and use their imaginations. They can be easily made with simple sewing techniques and can be used for storytelling and role-playing. Imagine this fun puppet show with these little guys!

What’s more adorable than a bunny? A baby bunny obviously. These simple DIY bunnies feature removable diapers and carrot shaped bottles. 

American Felt and Craft – Baby Bunnies with Carrot Bottles

4. Pet Toys: Felt is a durable and non-toxic material that is safe for pets to play with. It can be used to make a variety of toys such as catnip mice and chew toys for dogs. Zombie Mice would make your kitties crazy!

Invite your cat to battle zombies, zombie mice that is. Cats love felt, the texture allows them to sink their teeth and claws into the fibers, which they find immensely satisfying. 

American Felt and Craft – Zombie Mouse!

5. Party Decorations: Felt is a great material for making party decorations such as banners, garlands, and photo props. It can be cut into various shapes and colors to match any party theme. Our Cotton Candy Ornaments are are a smash as birthday party decorations!

Looking to add some sweetness to your holiday? Combine your love of sugary sweet candy with Christmas cheer to create fun felt cotton candy ornaments.

American Felt and Craft – Cotton Candy Christmas Ornament DIY

What do you usually do to overcome your crafter’s block?

Pocket Felt Stingray Ornament

14 Dec

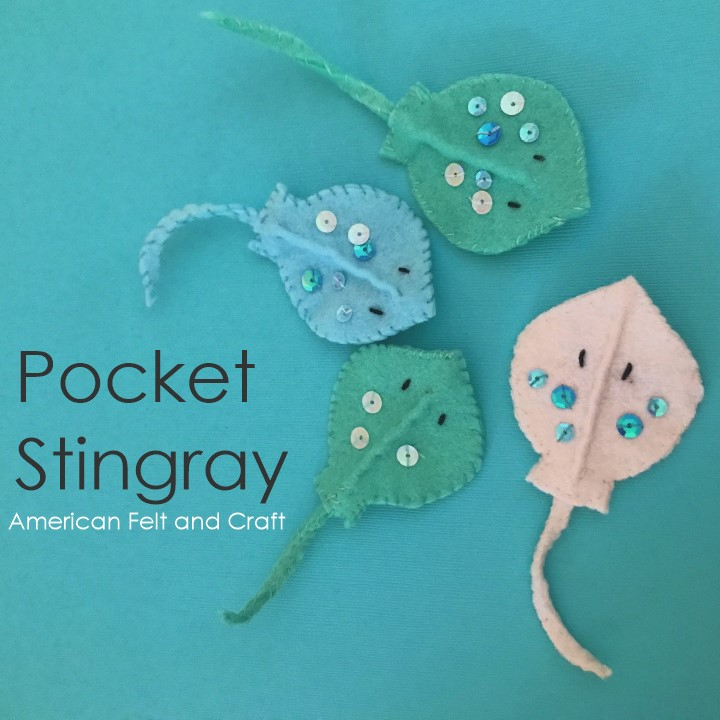
I am so smitten with the look of these little stingrays. I love the serious look from the top and the surprisingly goofy smile from underneath. There are many reasons a pocket sized sting ray might come in handy but these charming rays are definitely a must have for any aquatic mobile or ocean themed Christmas tree. If you choose to make them in the icy tones I chose you can even call them ice skates.

You will need:

To make a felt stingray

5″ x5″ scrap felt color or print of your choice, I used Aqua, White and Mint

Blue and white sequins or colored to match your felt

Matching threads

Black embroidery thread

2 small black beads or small doll eyes, you can also create eyes with french knots.

Sewing Pin – optional

Pattern for felt stingrays below

Cut:

One each of the stingray front and back and two tail pieces you can also freehand these if you prefer. For more on cutting small shapes see our post here

How to make a felt stingray

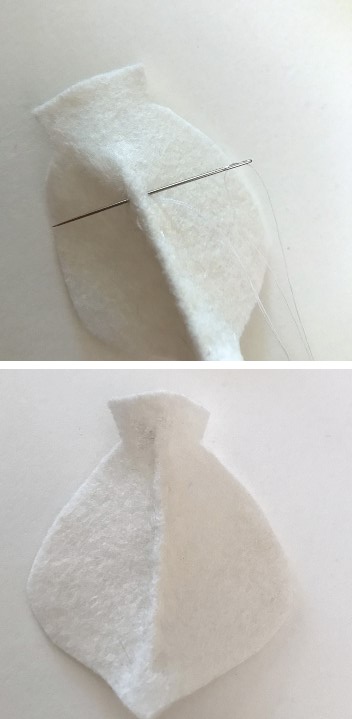
Starting with the larger piece (top) fold in half and pin if needed.

With a running stitch and matching thread sew the ridge along the top of the sting ray. Start a little below the pointed tip and ending before the base area (see sting ray pattern)

Sew two small stitches for the eyes with a single strand of black embroidery floss. Sew on sequins as desired. For more on attaching sequins see our post.

Set aside.

Accent the smaller (bottom) stingray by sewing down two beads for eyes. You can also use 4mm doll eyes or create eyes using black embroidery thread to create two french knots. Sew a smile using a small stitch in the center to hold the smile in place.

Create tail by overcast stitching the tail pieces together,

Overcast stitch the stingray front and back together with matching thread. Match the curves up as you go.

Leave the base of the sting ray open for the tail .

Close up the bottom with overcast stitches using a running stitch to attach the tail.

These felt sting rays look great in any color! To turn them into an ornament simply sew a loop through the the sting ray.

Happy Crafting!

~Andie

Are you part of the felt club?

Well why not? Join here for free patterns, tips, coupons and up to date info on all things felt!

Free patterns you may also enjoy

Felt Lollipop DIY

1 Dec
Felt Lollipop hearts

Sugar and Christmas are hand in hand in my mind and so often my holiday crafting turns to sugary sweets. I love the look of these heart shaped lollipops. The added sequins create a little sparkle if you choose to hang them on a tree or add them to a gift. You don’t have to save these cuties for Christmas they also look super cute as is and are perfect for some valentines day love or just a sweet reminder that you’re loved.

You will need:

To make a felt lollipop

3″ x5″ scrap felt color or print of your choice, I used Lipstick and Sprout

1″ x 3″ felt for lollipop stick I used prints from the Wrapping Paper Pack

Clear sequins or colored to match your felt

Matching threads

Stuffing

Pattern for felt lollipops below

Cut:

2 heart shapes from lollipop color of your choice and one “stick” piece from color or print.

How to make a felt heart lollipop:

Fold the long side of your stick to the center, the fold the other side over to form a stick.

Sew Up the stick

Pin and sew the long sides together with an overcast stitch and matching thread. Set aside

(optional) Sew 3 sequins to one side of the felt heart shape as marked on pattern.

Sew heart shapes together leaving the bottom open. Stuff lightly.

Place stick into heart shape and adjust so it is centered. Sew to heart with a few small running stitches along the base and continue to close up heart shape as needed. Sew a loop to one side to hang or attach to a gift.

Happy Crafting!

~Andie

Felt lollipops - felt food - heart

Are you part of the felt club?

Well why not? Join here for free patterns, tips, coupons and up to date info on all things felt!

Free patterns you may also enjoy

Cotton Candy Christmas Ornament DIY

22 Nov

Looking to add some sweetness to your holiday? Combine your love of sugary sweet candy with Christmas cheer to create fun felt cotton candy ornaments. These sweet felt cotton candy ornaments look great on any tree and the cones can be made in any color of pattern. Best of all they are simple enough for beginners and fast enough you can whip up a carnivals worth in no time

You will need:

3″ felt scrap for cone I used Wrapping Paper Pack

3″ x 6″ White fur felt

Felt scrap for leaves I used Sprout

Felt scrap for ribbon I used Tomato Soup

Red sequins I used Classic Red

Stuffing

Ribbon or cross stitch thread to hang

Pattern for felt cotton candy Christmas ornaments:

Cut:

2 felt cotton candy tops from fur felt – make sure these mirror each other so they will match up with the fur sides facing out.

2 felt print bases for cotton candy

(Optional) 1 felt leaf or felt for ribbon

Sew detail to the front of your cotton candy. Choose a ribbon or leaves with sequin berries.

For the leaves simply sew the sequins over the leaves to hold.

To create the ribbon cut a thin strip of red felt and tie bow, trim ends to size and sew into place with matching thread. Set aside.

Overcast stitch the cone together with matching thread. Don’t worry about sewing over the top of the cotton candy cone you will be sewing through it to attach the cotton candy head.

Sandwich cotton candy base between both sides of cotton candy head and sew down with a running stitch and matching thread.

Sew head pieces together with an overcast stitch and white thread. Stuff before closing.

Sew a loop with black cross stitch thread to hang.

Happy Crafting!

Andie

You might also enjoy