Tag Archives: pattern

Pocket Felt Stingray Ornament

14 Dec

I am so smitten with the look of these little stingrays. I love the serious look from the top and the surprisingly goofy smile from underneath. There are many reasons a pocket sized sting ray might come in handy but these charming rays are definitely a must have for any aquatic mobile or ocean themed Christmas tree. If you choose to make them in the icy tones I chose you can even call them ice skates.

You will need:

To make a felt stingray

5″ x5″ scrap felt color or print of your choice, I used Aqua, White and Mint

Blue and white sequins or colored to match your felt

Matching threads

Black embroidery thread

2 small black beads or small doll eyes, you can also create eyes with french knots.

Sewing Pin – optional

Pattern for felt stingrays below

Cut:

One each of the stingray front and back and two tail pieces you can also freehand these if you prefer. For more on cutting small shapes see our post here

How to make a felt stingray

Starting with the larger piece (top) fold in half and pin if needed.

With a running stitch and matching thread sew the ridge along the top of the sting ray. Start a little below the pointed tip and ending before the base area (see sting ray pattern)

Sew two small stitches for the eyes with a single strand of black embroidery floss. Sew on sequins as desired. For more on attaching sequins see our post.

Set aside.

Accent the smaller (bottom) stingray by sewing down two beads for eyes. You can also use 4mm doll eyes or create eyes using black embroidery thread to create two french knots. Sew a smile using a small stitch in the center to hold the smile in place.

Create tail by overcast stitching the tail pieces together,

Overcast stitch the stingray front and back together with matching thread. Match the curves up as you go.

Leave the base of the sting ray open for the tail .

Close up the bottom with overcast stitches using a running stitch to attach the tail.

These felt sting rays look great in any color! To turn them into an ornament simply sew a loop through the the sting ray.

Happy Crafting!

~Andie

Are you part of the felt club?

Well why not? Join here for free patterns, tips, coupons and up to date info on all things felt!

Free patterns you may also enjoy

DIY Felt Doll Diapers and Wipes

20 Nov

Sew some easy doll diapers and wipes set with our free pattern.

Changing diapers is a staple of playing with your favorite doll so it’s essential to have a steady supply of doll diapers on hand. If you’ve ever wondered how to make a simple doll diaper I assure you this is the absolute EASIEST way to DIY a doll diaper.

The whole project is only a few straight stitches and all one piece. Sewing through the velcro or hook and loop can be tricky without a sewing machine but it’s totally doable by hand. You can make this pattern no sew by using a good quality fabric glue like E6000.

Making DIY baby doll wipes packs are super simple since there is minimal stitching and all straight lines. I love the look of both the DIY doll diapers and wipe bag in felt prints but you can use felt solids just be mindful of front and back.

These easy doll diapers fit pretty much all dolls. We tested the felt diapers on Baby Alive, Melissa and Doug dolls and Cabbage Patches as well as that one bean stuffed cloth doll with plastic legs everyone seems to own.

Thanks to the adjustable waist it fit every baby style doll. Of course the diaper pattern is easy to size up or down if needed. If you are worried about major wear you can always double the felt and sew the sides together or use a 2mm thick felt but I found they did well with standard play.

You will need:

DIY Doll Diaper;

1 sheet felt color or print of your choice, I used Elephants, Blue Dot, Countryside Floral and Rainbow Dot

1 sheet white felt

Matching threads

6″ Velcro I used colors found here

Felt Diaper Pattern below

Cut:

Trace the outline of the diaper on the back of your felt sheet and cut.

Cut out 1 wipe package from felt print

Cut out 4 doll wipes from white felt.

. Place the a 4″ strip of loop (soft side) onto the center of the front of the diaper. (short end without flaps, printed pattern up)

Sew strip onto top of diaper.

Cut the remaining half, loop (scratchy side) into two pieces.

Sew onto inside flaps on inside of the diaper not on the front or printed side, see photo below.

You can use a glue or heat and bond to attach but sewing is really best as it seems to hold up better.

If you want to make a sturdier diaper sew two diaper pieces together attaching the hook and loop or velcro in the same way or simply use a 2mm tick felt. (3mm felt is too thick for this project)

Thats really all there is to it.

Creating DIY doll baby wipes is just as easy you don’t even need a pattern, but don’t worry we’ve included the pattern too!

Begin by cutting the wipes from white felt. You should get 4 or 5 to as sheet.

To create the doll wipe package fold your felt rectangle so the long pieces barely overlap and pin.

With felt slightly overlapping stitch along the short edges using a running stitch. Stich 1/2″ over of overlapped area. Use a running stitch and matching thread to sew the package. This is a great project for a new or beginning sewer!

The stitched areas are shown below in black.

Black shows where the stitching should be.

Fold your wipes slightly and insert them into the package. Pull one through.

See told ‘ya, it was easy!

Happy Crafting!

~Andie

Hey! Are you part of the felt club?

Well why not? Join here for free patterns, tips, coupons and up to date info on all things felt!

Free patterns you may also enjoy

DIY baby bunnies with carrot bottles

DIY Felt Bandages

Stethoscope from felt

DIY Felt Stethoscope

DIY Felt Food – Chocolate Heart Cake

14 Jun

Embracing this months cottage cozy theme I knew if I was going to make a felt cake it would need to be chocolate and it would need to be a heart shape. A little felt cake that would be simple to make but would look right at home in a play picnic basket or tea party.

I experimented with adding some DIY felt roses as an added accent to this felt food cake pattern but it just lacked the simple rustic feel I was hoping for. I love the look of the felt daises against this fun felt dessert. If you are wondering how to make a felt heart cake, it really is surprisingly easy. Below you will find a tutorial for a simple heart shaped cake tutorial dripping with a dark chocolate felt “ganache” and accented with DIY felt daisies.

You will need:

9″ x 6″ felt cake color I used Brownie

9″ x 12″ felt icing color I used Chocolate

Stuffing, scraps or foam to fill heart cake

Free pattern to make felt heart cake:

Felt daises – full tutorial Here

Cut:

2 Cake sides from light brown felt

2 icing sides from icing color, top and bottom from icing felt

(you can create a bottom from light brown if accuracy is important to you)

Sew daisies to felt cake top, you can also glue these down with got glue if desired.

Sew icing drips to both sides of cake with matching thread and a running stitch.

Place cake sides outsides facing and sew sides together. This meeting point will the the dip at the top of the heart.

Sew the top to the side with and overcast stitch and matching thread.

Sew bottom the felt heart cake the same way as the top. Add filling, stuffing or foam before closing to help it hold structure. If you find it too lumpy try reinforcing the sides with a bit of thin cardboard (like a cereal box) before stuffing.

Happy Crafting

~Andie

Free felt patterns you might also enjoy:

Bunny Ear Teether Tutorial and Pattern

26 Mar

IMG_1004Adorable bunny ears are the perfect Easter DIY for the little one’s in your life. These little ear teethers are a boutique staple and always a hit at baby showers.  You will need a sewing machine but have no fear novice sewers, this one is extremely simple to master.  The “ears” can be slipped off for washing or switched out based on mood. Customize the fabric to your nursery theme or baby shower. I backed these guys in a minky dot for some fun soft texture but a terry cloth would make a great choice for hard core teethers. The addition of crinkle material makes these ears extra fun. Because what baby doesn’t go crazy for crinkle?

bunny ear teether pattern

29541613_10216089601616496_6830393825175112294_n

You will need:

1/8 yard fabric of choice

1/8 yard backing of choice, minky or terry cloth add a fun texture.

All natural wood teething ring (these rings are solid and the wood won’t splinter)

Sewing machine

Pattern to make bunny ear teether (At the end of post)

Crinkle Material for baby toys (optional) Crinkle Material 

Cut

Cut out ear pattern on fold from fabric of your choice.

29595488_10216089600816476_566937684625245037_n

Place the fabrics together with the printed (front) sides facing each other.

Pin to backing and roughly cut around in a rectangle. Minky and other silky fabrics shift it’s easier to just sew down and then cut.

How to make bunny teethers - pattern and tutorial

How to add crinkle material to  your handmade baby toy.

Adding crinkle to your baby toy is super easy. Just place the toy crinkle on top of one side of the project and then sew. (see pink chevron print above) The crinkle material will be in the center when turned.

AFC’s crinkle is formulated to be washer/ dryer and iron safe so treat as you would normally no special requirements.

Sew pieces together leaving around 1/4″ from your stitch to the edge of the fabric. Leave at least 1″ near the center of one side to turn rightside out.making baby teethers - bunny ear ring

Cut off extra backing fabric and trim off the unsewn part of the ear tip.

Turn.  Use a chopstick or unsharpened pencil to help you get the ear tips.

3 (1)

Supplies to make baby toys

Tuck the raw pieces of the opening together, pin if needed and sew shut.

4 (2)

Iron along the edges only (this helps preserve the minky bumps) and top stitch around the ears one more time.

bunny ear teether pattern

That’s it! Now to add the teething ring to your brand new rabbit ear teether.

6 (1)
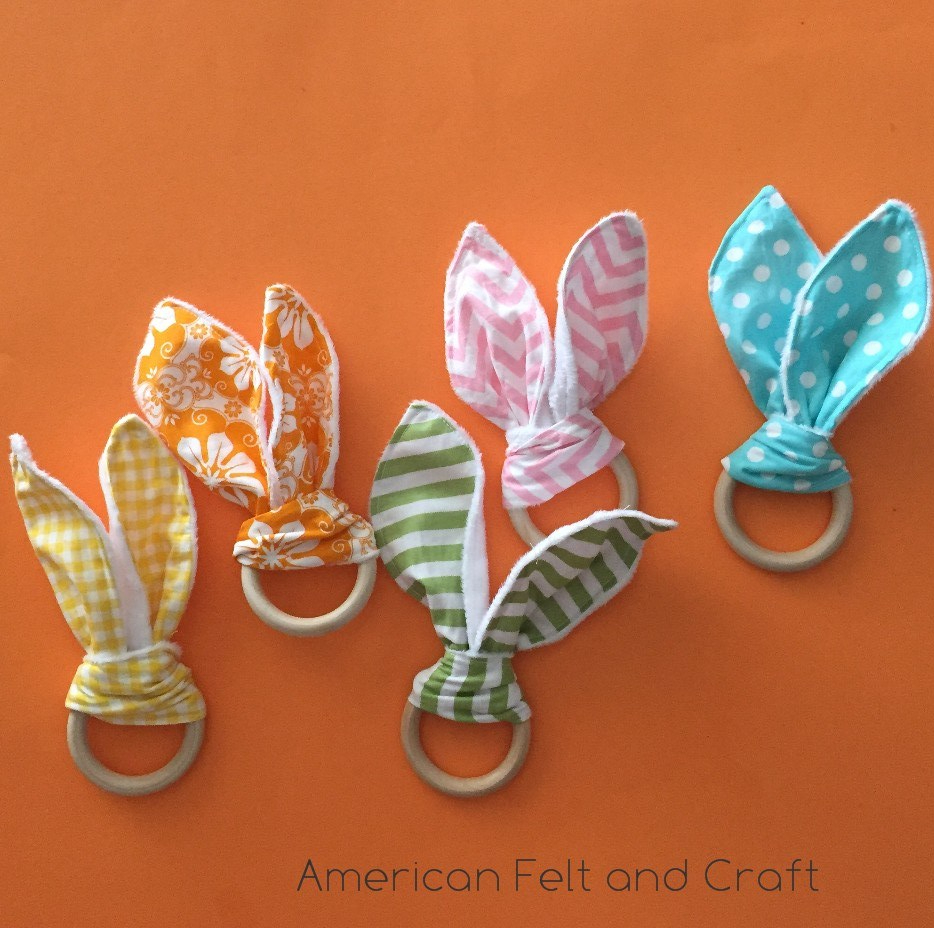
How to attach to teething ring

  1. Fold back sides together and pull the center into the ring to make a loop.
  2. Pull the ears through the loop slowly adjusting to keep the print facing forward as needed.
  3. Tug on the ears to tighten.

Happy Crafting!

~Andie

Bunny Ear Pattern PDF: BunnyEarsPattern

BunnyEarsPattern

bunny ear teethers

You may also enjoy: 

Slip on baby booties
Felt Food Chicken Nuggets