
 There is no quicker way to brighten up a space than with a bouquet of felt rainbow roses. These beauties make a great DIY felt floral arrangement or even a stunning felt bridal bouquet for a color loving bride. Bring some rainbows into your space with this free, no sew rainbow rose pattern and tutorial.
You can also use one color felt or even shades of monochrome colors to create felt roses.

You will need:
Wrapped floral wire cut into 12″ and 6″ lengths
Felt in rainbow colors I used Lavender, Pink Tutu, Flamingo, Egg Yolk, Chartreuse, Ice, Aqua, Mint and Sunshine.
The amount you will need will vary but a 9″ x 12″ sheet of each should make you around 5 flowers.
Green felt for rose base and leave I used Fresh Cut Grass
A 9″ x 0.5″ scrap of felt the color doesn’t matter as it will be entirely covered
Hot glue gun and glue
Pattern to make felt rainbow roses (PDF pattern for felt roses)
Cut
1 strip from any color felt
Petals as marked on pattern from various felt colors
1 base and 1 of each leaf from green felt

You have lots of options for rainbow rose petal layout you can place the matching petal colors together, lay them adjacently so they slightly meet along the rose or my favorite look which was to lay the felt rose petals randomly. The more petals you choose to use the fuller your rose will be so feel free to keep adding until you are happy with the look of your felt roses.

Wrap Strip around wire gluing as you go. Set aside

Take the half circle piece and glue to create a cone.

Glue cone to the wrapped wire. Set aside.

Lay the inner petals down and run glue along one of the rounded sides. Add all the inner petals.

Roll inner felt petals together and hot glue along the open sides.
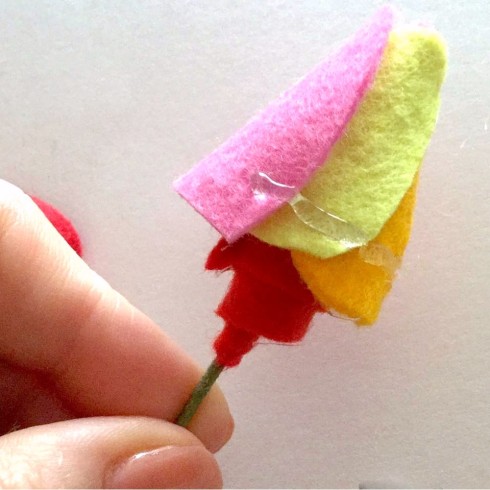
Glue to cone on the wire. And lay a 1″ length of hot glue along the side.

Add the 4 middle petals to the base overlapping slightly.

Fill the gap at the base with a bit of hot glue and press inward and pinch together.


 Place a line of hot glue along two of the middle petals.
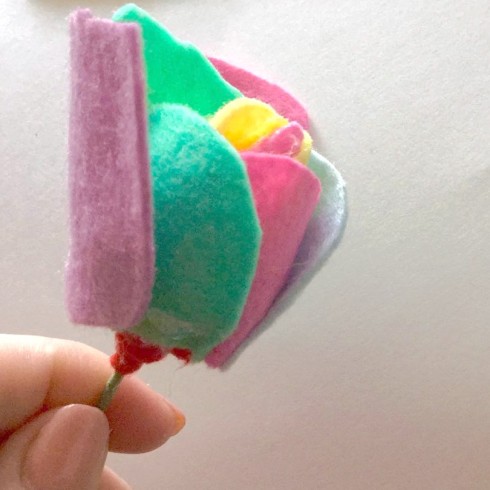 Begin placing the outer petals centered so they don’t overlap and the petals flare out more. Repeat until you are happy with the look of your rainbow felt roses.
 Lay hot glue around the inner gaps a the base of the rose and pinch together just as you did in a prior step. Press until glue sets.

Cut a line to the center of the rose base so you can slip it over the wire and place hot glue over the whole shape, carefully slip onto the base of the felt rainbow rose with glue side down. Press pieces together.

To make felt rose leaves.
Lay glue down the center of the leaf and press one side of the 6″ wire to the leaf, pinch at the base.

Repeat with second leaf and side. Twist the felt leaves around the rose and add a bead of hot glue to hold firmly. Adjust leaves as desired.


Happy Crafting
~Andie
You might also enjoy:


One Response to “Rainbow Felt Roses Tutorial”