
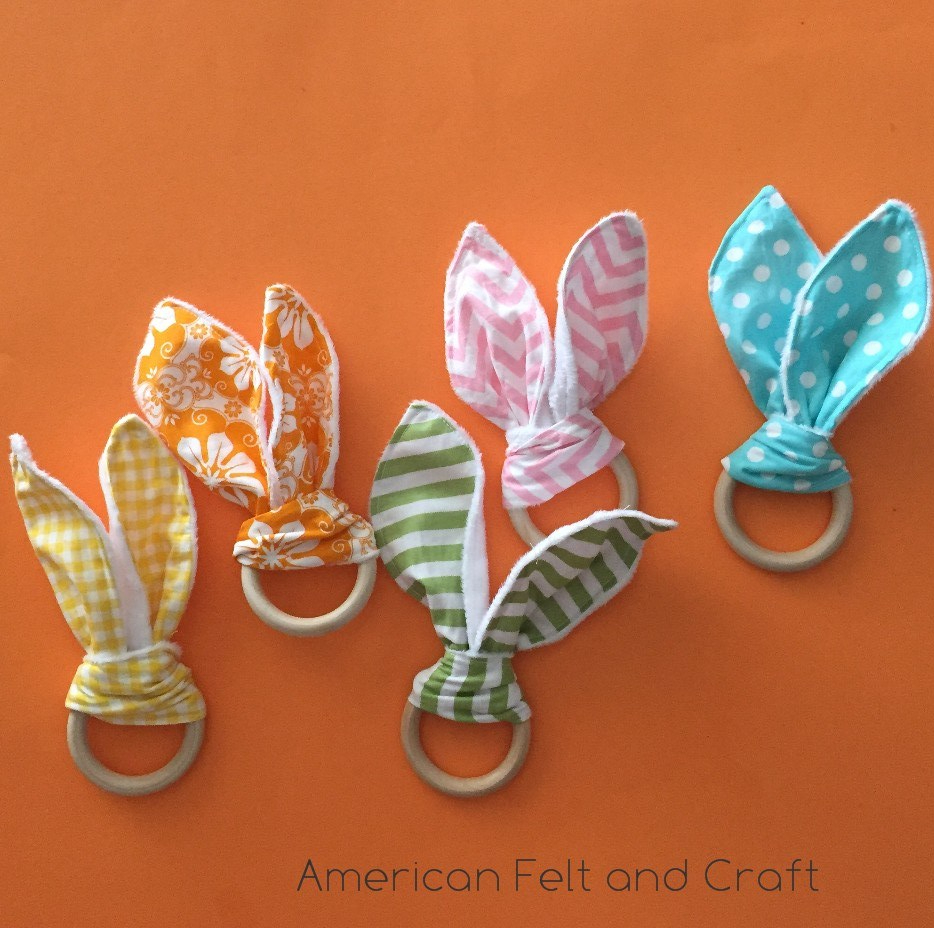
 Adorable bunny ears are the perfect Easter DIY for the little one’s in your life. These little ear teethers are a boutique staple and always a hit at baby showers. You will need a sewing machine but have no fear novice sewers, this one is extremely simple to master. The “ears” can be slipped off for washing or switched out based on mood. Customize the fabric to your nursery theme or baby shower. I backed these guys in a minky dot for some fun soft texture but a terry cloth would make a great choice for hard core teethers. The addition of crinkle material makes these ears extra fun. Because what baby doesn’t go crazy for crinkle?

You will need:
1/8 yard fabric of choice
1/8 yard backing of choice, minky or terry cloth add a fun texture.
All natural wood teething ring (these rings are solid and the wood won’t splinter)
Sewing machine
Pattern to make bunny ear teether (At the end of post)
Crinkle Material for baby toys (optional) Crinkle Material
Cut
Cut out ear pattern on fold from fabric of your choice.

Place the fabrics together with the printed (front) sides facing each other.
Pin to backing and roughly cut around in a rectangle. Minky and other silky fabrics shift it’s easier to just sew down and then cut.

How to add crinkle material to your handmade baby toy.
Adding crinkle to your baby toy is super easy. Just place the toy crinkle on top of one side of the project and then sew. (see pink chevron print above) The crinkle material will be in the center when turned.
AFC’s crinkle is formulated to be washer/ dryer and iron safe so treat as you would normally no special requirements.
Sew pieces together leaving around 1/4″ from your stitch to the edge of the fabric. Leave at least 1″ near the center of one side to turn rightside out.
Cut off extra backing fabric and trim off the unsewn part of the ear tip.
Turn. Use a chopstick or unsharpened pencil to help you get the ear tips.


Tuck the raw pieces of the opening together, pin if needed and sew shut.

Iron along the edges only (this helps preserve the minky bumps) and top stitch around the ears one more time.

That’s it! Now to add the teething ring to your brand new rabbit ear teether.
 How to attach to teething ring
- Fold back sides together and pull the center into the ring to make a loop.
- Pull the ears through the loop slowly adjusting to keep the print facing forward as needed.
- Tug on the ears to tighten.
Happy Crafting!
~Andie
Bunny Ear Pattern PDF: BunnyEarsPattern


You may also enjoy:


Thank you so much Daughter in law just asked for these.
The pattern printed at 10″ long…looks very big for a small teething ring. Is it supposed to print at a different percentage or does turning it make it smaller?
The doubling of the fabric and the looping processes will make it substantially smaller, the size of the ring you use may also play a part. But 10″ is correct.
Hi, sorry not great at these things. The bunny ear cut out. It says cut at fold. Very stupid question. What do you mean cut on fold , how big of a cut ? because when I print it its just going to print as single one sided paper ear. Yet it is double ear ? So sorry please help …lol