Sugar and Christmas are hand in hand in my mind and so often my holiday crafting turns to sugary sweets. I love the look of these heart shaped lollipops. The added sequins create a little sparkle if you choose to hang them on a tree or add them to a gift. You don’t have to save these cuties for Christmas they also look super cute as is and are perfect for some valentines day love or just a sweet reminder that you’re loved.
You will need:
To make a felt lollipop
3″ x5″ scrap felt color or print of your choice, I used Lipstick and Sprout
Place stick into heart shape and adjust so it is centered. Sew to heart with a few small running stitches along the base and continue to close up heart shape as needed. Sew a loop to one side to hang or attach to a gift.
Happy Crafting!
~Andie
Are you part of the felt club?
Well why not? Join here for free patterns, tips, coupons and up to date info on all things felt!
No cottage experience would be complete without felt toadstools. These Diy felt toadstools could not be any cuter!
It can be a bit tricky to learn how to make these felt mushrooms, but once you get the hang of it you’ll be ready to make sew up dozens for wreaths, gift tags, imaginative play, keychains, mobiles, headbands and ornaments. Is there anything these felt mushrooms wouldn’t make cuter?
Other than our free felt mushroom pattern you’ll need red and white felt, stuffing and a small scrap of sturdy cardboard. Switch up the colors to change these felt toadstools to DIY felt button mushrooms for an adorable felt food.
So cute!! Felt toadstools are a must make craft!
To make 5 felt toadstool mushrooms you will need:
Please keep in mind this pattern is made for high quality wool blend felt.
Using a thinner, weaker or stiffer felt will not work as well if at all.
9″ x 12″ White felt – I used two whites for my felt mushrooms Fresh Linen for the base and ruffle and White for the spots. *
Ruffle and felt mushroom base from white of off white felt.
Free hand cut spot shapes from white felt
Center circle from cardboard
Sew spots randomly onto mushroom top, avoid the outside where the piece will be gathered.
Vary the size and location of the spots so each mushroom is unique. You may be tempted to glue these on but they just don’t sit as well when you gather the felt in the next step so it’s worth it to take the time and sew them down with a few stitches individually.
Run a gathering stitch around the outside of the felt toadstool top with a sturdy thread.
Pull slightly and begin to stuff with stuffing. It helps to roll the stuffing around in your hands to help it form a more solid shape.
Place cardboard circle onto top and hold with thumb while you pull the felt mushroom closed.
It can be tricky but do the best you can we will tighten it up in the next step.
Pull tightly then go back through the gather on section at a time to tighten it up, pull until you there is no slack and knot closed.
Insanely cute!
Repeat with all tops
Hiding the knot at the bottom randomly sew stitches along mushroom top with a single strand of white embroidery floss. Keep these stitches a bit irregular. Exit through bottom of mushroom head and hide the knot in the opening from the gather.
Repeat with remaining mushroom tops and set them aside. Doing this after we have gathered and stuffed the piece insures the stitched spots don’t get too loose and insures you get to place the “spots” where you want them.
Experiment with making the stem a little longer by or shorter so your mushrooms vary just a bit more if you want.
You can also cut the long end a but to create a thinner stem but you may need to trim down the ruffle as well.
Roll stem up and overcast stitch closed along the long edge.
Wrap ruffle around the stem and stitch closed along the seam with an overcast stitch.
Run needle all the way though the stem and back again making a stitch in front to hold.
You could also hot glue this into place but the ruffle won’t flare out as much.
Stick the finished stem onto the felt toadstool. Run a sew stitches through both the mushroom head and the stem several times in several directions to hold.
You CAN also use hot glue here! Place a healthy dollop of glue onto carboard through the gathered opening and stem in and down. Let glue set with head down.
And that’s all it takes to make dozens of felt toadstools!
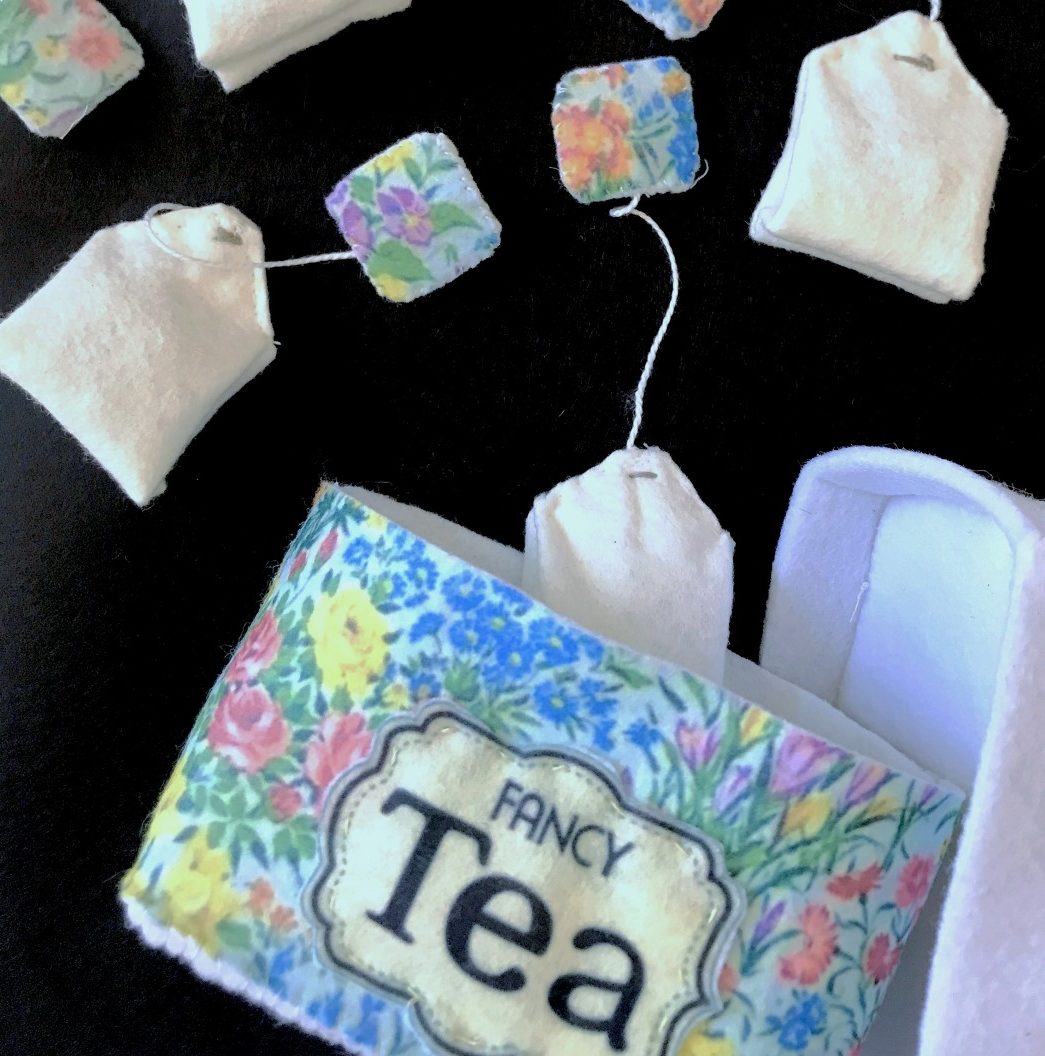
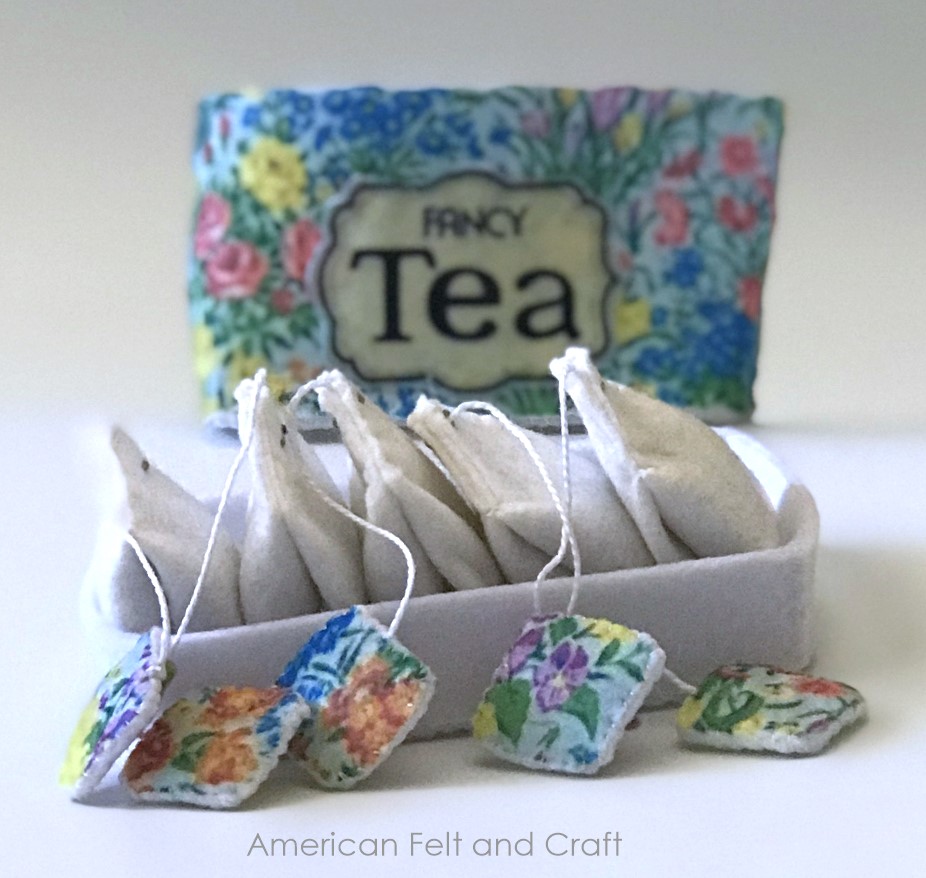
Sweet little violet shortbread cookies make a charming addition to your cottage tea party. The stark purple tones of tiny wild violets look so cute against the scalloped “icing”. Creating a plate of these little felt shortbread cookies is super simple and the results are the bees knees.
We’ve shared a lot of free felt food cookie patterns over the years (chocolate chip, fortune cookies, rolled cookies) but these beauties are a real stand out! These easy to create felt tea party cookies are just so pretty. Read on for how to make these floral felt confections including the free pattern for the felt shortbread cookies of your cottage daydreams.
This set features a matching floral patterned felt but any 2mm thick felt will do, the standard wool blend is too floppy for this project unless you want to double up but that can make stitching a bit tricky. Stiffer or thick felts are best for this project and I think the Cottage Floral print I used here for the felt tea tin and tea tag backs worked out wonderfully.
When working with felt objects in need of structure 2- 3mm felt is a game changer, it easily holds shape without stuffing and doesn’t need to be finished off along the tops or bottoms because it won’t stretch out as easily.
You will need some filling for your tea bags and shredded scraps work well, if you are using a high quality felt for the felt tea bags the color wont matter.
In regards to the label have included the image on the pattern in reverse if you’d like to try printing on special paper and ironing it on (although that method can be prone to flaking) as well as a blank one for hand stitching.
All June long we will be including a free felt “Tea” label with every order while supplies last.
This label is colorfast, nontoxic and washer dryer safe. If you decide to craft up a set of DIY felt tea bags with this free pattern we’d love to see your finished product http://www.facebook.com/feltandcraft
You will need:
To make a set of 5 tea bags and 1 tin you will need:
2- 3 mm thick felt for the top, bottom and sides of tin. 8″ x 11″ total *
5 tea bags and 5 tea tags and blank tag from wool blend white felt
2 tea tin sides and 5 tea tags from patterned 2mm thick felt
1 bottom, 1 top and two sides from 2-3mm thick white felt
5 – 6″ long tea bag strings knotted on each end
Sew lemon shape with yellow thread and a running stitch.
Place strawberry greens down and sew berry shape over top with a running stitch, accent with a few stitches in a contrasting color.
Sew mint shape down with matching thread
Sew lavender shapes down with a single strand of green embroidery thread.
Place peach greens onto tag and sew peach into place on top.
Place one of the knotted ends in-between the patterned and detailed tags, trim to match if needed and overcast stitch around the outside of the tag to hold. Repeat with each tag.
Fold a tea bad shape in half lengthwise and overcast stitch with matching thread.
Move the seam to center and fold so both seams face outward. Stitch along the bottom of the bag.
Trim felt for filler and fill each end with about a tbs of felt. Fold so the seams face inward and trim tops to a matching point. Be careful not to cut through the tea bag seams.
Place the other end of the knotted tag between the tea bag and stitch closed with small stitches using a running stitch and matching white thread.
Optional: Place a small grey stitch at the top of each tea bag. Repeat for each tea bag.
If you are using a printed tag sew to the center of one of the side pieces. If you are creating your own label stitch the work tea onto your label and sew to side piece.
Center the label to the front and sew onto thick felt base with an overcast stitch.
Center second side and stitch. When sides overlap sew them together with a running stich, this will give the tin added stability.
Sew lid sides to tin top the same way trimming if needed and sewing the side together without overlap.
Enjoy a legendary tea party!
Happy Crafting!
~Andie
Hey! Are you part of the felt club?
Well why not? Join here for free patterns, tips, coupons and up to date info on all things felt!