Archive | June, 2009

Felt food 101- How to make Felt Food lesson 5 Stuff it!

29 Jun

felt food how to fall veggies

A little backround,

3 years ago I was put on bed rest during a pregnancy it was also around this time that I spent my daughters college fund on a beautiful pink retro kitchen set, I think you know which one I am talking about, you know the one everyone passes and says, “who would pay that!?” well I did, anyway for Christmas that year along with her lovely kitchen she received some wooden play foods, which being very little she promptly used to scratch and dent her wonderful kitchen…needless to say those little suckers were gracing the shelves of goodwill by weeks end!

But what can you do in a play kitchen without play food, and I wasn’t about to bring a bunch of plastic junk into my home, then the solution presented itself in the form of felt food. I have now made everything from soup to nuts, literally. After crafting felt food for sometime I began to get frustrated trying to find the bits and pieces of everything I needed to do what I wanted to, so together I decided to create the store I was looking for, American Felt and Craft. Please stop in sometime and take a look around. And as always if you have any questions I am just an email away and I’m happy to share my knowledge and a few of my favorite patterns with you!

Stuff it

DSCN7605

Natural Wool and Synthetic Polyester Stuffing

In this the last installment of Felt Food 101 I’ll be convering the subject of stuffing your creations.

If you just doing some bare bones construction all you will need is stuffing any kind from any place, I have even been known to head to tag sales for stuffed animals to butcher for this exact purpose, the bonus to this is that your saving a huge, and generally ugly stuffed animal from rotting in a landfill, this is especially important because fiberfill is a plastic.  While it does eventually break down it’s chemical components soak into the ground and can get into the ground water so any you can salvage for a higher purpose is great.  I usually buy my giant stuffies for about 2 bucks sometimes less. I send them through the wash with bleach two times and then they are ready to go. However with the advent of bed bug outbreaks all over the country I’d hold off on this technique unless you know the stuffie.

If your stuffie is too big for your machine unstuff it and place stuffing into pillow cases knot at the top and run through the washer. Please be forewarned if you’re not careful one of your children will inevitably fall in love with said animal it will grace your living room for the next few years! SO HIDE YOUR STOCK IN THE GARAGE!!!

Of course you can always buy your stuffing. If your buying fiberfill I would recommend going with a mid-range to high priced bag the cheapest stuff has very short fibers which fly everywhere and are really irritating to your nose, eyes and lungs, and I hate the thought of that stuff creeping out into little lungs. You may also want to beware buying the super cheap stuff  often marketed as premium quality fiberfill, it’s grayish in color, I have heard of peoples’ projects becoming permanently stained by this stuff, since the blueish strands are apparently not color fast.

Your other last stuffing option is wool. I have begun stuffing with wool and it is so much nicer and really not much more expensive than the plastic fiberfill stuff.  And because wool has antibacterial and antimicrobial properties I feel better about giving it to my kids. You can buy wool stuffing at our store. Or through various local and online vendors. Another thing I have noticed about wool is that is seems to have a much larger loft than plastic stuffing so you get more puff for your buck.

When using stuffing to make felt food there is one golden rule it is always better to under stuff than to over stuff. over stuffing results in bulges and puts alot of stress on your seams. Over stuffing also results in hard felt food which isn’t nearly as love able.

Alternative methods

If you’re getting really into the whole felt food thing you’ll soon learn that there are many applications where plain old stuffing just won’t do, and you may want to invest into different stuffing methods like foam and batting.

Wool and polyester batting

Wool and polyester batting

Batting stuffs just like stuffing only it  lays flat  and stays that way so it’s perfect for making flat low items like pizzas, cookies, and slices of bread. You use it just like stuffing only you cut out the size and shape piece you need and slip it into your piece before closing it up. Batting is also available in wool and polyester. Wool is preferable for appearance , loft and ecological reasons. I find with synthetic batting I usually have to cut to or three of my filling shape versus 1 in the wool. You won’t need much batting since a little goes a really long way. Batting is usually sold in lengths and widths matching standard mattress sizes since it is used to make quilts. If you plan on only making felt food a crib size batting will be more than enough.

Foam round for cakes sold at American Felt and Craft

Foam round for cakes sold at American Felt and Craft

Foam fits in where batting leaves off it’s great for flat high things which are sometimes hard to get to hold a shape like cakes, tarts, pies, sticks of butter etc etc…  The taller the item the more likely it is to be distorted when stuffed with regular stuffing. By foam I mean foam rubber the kind used to make chair pads and dog beds not Styrofoam which is entirely different and should never be used to make felt foods.

When using foam you can either buy pre-cut shapes or buy foam  by the yard and cut it to shape.  The thicker the foam the more expensive it is.

I find that you want no more than 3 inches tall for cakes,  2 inches or less for pies and  ½ inch or less for bread slices, although when you are working with something thin batting should work as well or better than foam.  If you can’t find the size you want you can attempt to glue to foam rounds together to achieve more height this is much harder to do than you would think, in order to accomplish you will need to acquire foam and fabric adhesive,  this is a spray glue sold at upholstery shops and at some hardware stores. If you attempt to glue the foam any other way it will melt, shift or break apart under stress. I would recommend using stuffing before I would recommend gluing foam. We sell pre-cut foam rounds in many sizes and shapes for your felt food projects, all of our foam is pre-cut as well as being fire retardant.

Selection of foam rounds from American Felt and Craft.

Selection of foam rounds from American Felt and Craft.

Should you decide to cut your own you may be asking yourself how the heck you’re going to cut the foam. If your foam is very thin you may be able to use scissors otherwise you will need an electrical carving knife so it’s worth it to buy a good one. PLEASE PLEASE DO NOT ATTEMPT TO USE A HOT FOAM CUTTING WIRE, these are used to cut Styrofoam which heats and cools quickly if you attempt to cut a foam pad with this it will create a black smoke which is dangerous to breathe in and may cause the foam to melt and adhere to your skin causing terrible burns!! Please note your cuts do not have to be completely even or perfect when covered with felt lumps, bumps and unevenness tend to completely disappear.

For more on cutting foam check out our Guide for cutting your own foam:

foam felt food tutorial

https://americanfeltandcraft.wordpress.com/wp-admin/post.php?post=1845&action=edit

Hold it down in there

You might also want to add a bit of rice, un-popped popcorn kernels, doll beads, or beans to the bottom of some of your felt food it will help it to stand nicely. The food items can get a little questionable over time so if your in this for posterity I would use doll beads.

Adding something

Depending on the age of the kids your making the felt food for you may want to consider placing a rattle or squeaker inside your felt food. American Felt and Craft sells rattle inserts in 2 sizes, jingle ball inserts and squeaker inserts in 3 sizes. When making felt food for a family with children in multiple age ranges this is especially nice since the smaller ones will get just as much enjoyment from them as older more culinary minded siblings.
Jingle bell ball crafting Make a baby rattle


Previously: Putting it all together

Chop Chop- Cut Apart Felt Food Carrot, Free Pattern & Tutorial

22 Jun

Free Felt cut apart veggie tutorial from American Felt and Craft #FeltFood

What’s more fun than play veggies ready for slicing?

Besides a barrel of monkeys, which actually just sound dirty and loud to me but to each his own I guess… where was I… oh yeah veggies.

Here as promised is the felt carrot tutorial. You can do this with any felt food you’d like you’ll just need to modify the pattern by cutting it into smaller pieces and creating a Hook and Loop or Velcro inside. American Felt and Craft now stocks 16 diffrent colors to match with nearly anything you can dream up.

Keep in mind that most quality Velcro (aka hook and loop) is very strong so for the sake of your pieces posterity I would recommend “cutting” pieces apart with a plastic, wooden, or even felt knife rather than pulling on them.  The little blue knife from Ikea  pictured above is perfect for this.

For this project you will need:

1 sheet Sweet Potato, or orange colored felt (will make 2 carrots)

1 sheet Fresh Cut Grass or dark green felt (will make 2 carrots)

Stuffing, I used 100% wool legacy stuffing but any stuffing will do

1 6 inch strip of colored hook and loop in Fresh Squeezed. (will make 2 carrots with quite a bit left over.)

Thread to match orange colored felt.

If you need help with stitches please refer to Putting it all together

Step 1 cut pieces from templates, below;top

Cut 1 carrot top from fresh cut grass felt.

Cut everything else from Sweet Potato color

carrottemplate

Step 2.

Roll stem up stem piece and stitch up as shown, stitching can be done with any color thread,  it won’t show.carrottop1

Step 3

Cut Hook and Loop (aka Velcro) into small circles, obviously you won’t be using this color.

velcrocircles

stitchintoplace

Step 4.

Match up rounds you have cut out, you should have two of each place scratchy side (hook) onto one of the pieces and soft side (loop) to matching piece, stitch into place as shown. Make sure the right pieces fit together, it will be hard to correct later.

Step 5.  Sew up sides of rings using a running stitch as shown below, turn inside out so seam doesn’t show

carrotrings1

 lovefelt

ring1Step 6.

Sew bottom to slice A,  the dot represents Hook and Loop (Velcro).

Depending on how far in you made your seam on each carrot ring the bottom and top circles may need to be trimmed a bit to fit properly.

gathertop

Step 7

Set up like a cup and gather stitch around and lightly stuff.

finishedtopStep 8.

 Place stem into carrot and pull gather stitches tightly, pass needle through the stem a few times to hold it into place, the top is done.

ringtopandendStep 9

Sew tops and bottoms on to remaining rings as specified above. Stick Hook and Loop (Velcro) sides together and Viola! A felt carrot!

chopchop6

OPTIONAL: To create, carrot “dents”  make a large running stitch in side of finished slice, Hiding knot in the seam. Come up through top seam, pull tightly and knot.  Repeat as desired.

Please let us know if you like the felt carrot pattern. We would love to see finished pictures!

Enjoy and please remember this pattern is for personal use only!

~Andie

Felt Food 101 – Lesson 4 Putting it all together

16 Jun

felt food how to fall veggies

This is part 4 of our how to make felt food series, I’m Andie a felt food addict owner of American Felt and Craft. Please stop into our store sometime and take a look around. And as always if you have any questions I am just an email away and I’m happy to share my knowledge and a few of my favorite patterns with you!

Felt Food 101 – Lesson 4 Putting it all together:

Putting it all together

There are many ways to connect to pieces of felt, each has it’s advantages and disadvantages. Here I will discuss machine and hand stitching, stitches to use and gluing, you can also needle felt, felt food but I will touch on needle felting in another post.

constructionscissors

Sewing felt

Machine sewing vs. Hand Sewing

Some shapes and forms can really only be done with an old fashion needle and thread. Machine sewing is an option, for some pieces but you’ll need to remember to enlarge your pieces since the machine sewn version will be about 3/4 size.  If you are concerned about all the fuzzies getting into your machine you can avoid this by putting a piece of paper under the seam line and one over it. I recommend regular scrap copy paper I have heard others use newsprint but I would be afraid of marking up my felt with inky fingers. You may also want to use the paper method if you have trouble holding your felt in place on the machine because it is acrylic since synthetics tend to slide. Also keep in mind that removing a seam from machine sewn felt can be extremely difficult if  not impossible.  I recommend simply cutting the seam out. Machine sewn pieces are also more likely to be flatter and you will require the use of  more felt since the seams will diminish a sewn pieces’ size. With hand sewn pieces what you see is pretty much what you get there are usually very few surprises since you can easily see problems as soon as they arise and removing your stitching is very simple. Personally I believe that hand sewing is by far the best method for making felt food unless your making a lot of the same item.

Hand sewing stitches

When hand sewing it’s interesting to note that suprisingly  few stitches are used in felt food construction here is a basic walk through and illustration thanks to our friends at The Popcorn Tree .

overcast

 Overcast Stitch/ Whip Stitch

(note: overcast stitch and the whip stitch are in fact the same stitch however whip stitching is done on two pieces of fabric to join them and overcast stitching is done on only one piece to prevent fraying. Most people use the terms interchangeably and we’re suckers for peer pressure so we’ll use the terms interchangeably too!)

  Without a doubt this is the stitch I use most often when making felt food. It easily joins to pieces together without losing any fabric to seams and lays remarkably flat. Best of all with a matching thread it almost disappears into the finished piece.

Whip/ overcast stitching is very forgiving since the seam does have a bit more adjust-ability than other stitches. A word of caution; placing stitches too far apart on an item you intend to stuff will cause stuffing to fall out. The stitches should be about 1/16″ apart to prevent this. Many people will pull too tightly on the thread when sewing this way. There is no need to use more thread tension when stitching this way, pulling thread too firmly will not help avoid gaps and will create a rounded seam, or lip which may effect your finished piece.

  running stitch 

  Running Stitch

This is the basic in out stitch taught to most of us as children and is used for connecting pieces which need to remain very firm and rigid. Sewing this way also helps when you want to prop of your piece since when turned inside out the pieces will not lay flat. Other than it’s simplicity the running stitches big advantage is how easily it can be removed. Ideally you want each stitch to be about 1/4″  in length or smaller.


gatheringGathering and Basting Stitches.

These stitches are not used as often in felt food design but are very useful for making rounded or dome shapes. The only real difference between the gathering stitch and the running stitch is the tension in the thread. Gathering stitches are pulled tightly, the effect of this on felt is somewhat less impressive than it is on other fabrics due to the thickness of the felt. The gathering stitch and the basting stitch are also essentially the same but the basting stitch is most often temporary and since it will be  removed large stitches are not only acceptable but actually easier to work with.

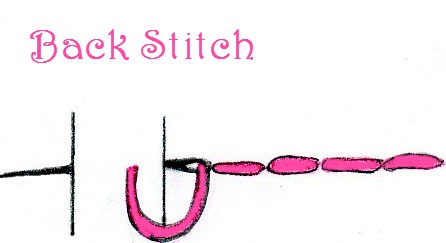
backstitch

  The Back Stitch

Back stitch is most often used as an outlining stitch, and is often used to create text or outlines on a felt piece.  As the name suggests small stitches are made in a similar fashion to the running stitch but the needle returns to complete a stitch at the same time it creates a new one.

blanket


Blanket Stitch

The Blanket stitch can be called a more decorative version of the overcast/ whip stitch. The biggest advantage to blanket stitching is that because of the obvious top seam it is very distracting and uneven stitching is not as noticeable. The blanket stitch is used to create a decorative edge and will hold felt together in much the same way as overcast stitching. This stitch is not subtle and is made to be shown off.
This  stitch can be a problem since you will not only create a seam but a larger and more obvious one and the top line of the stitch holds the pieces a bit farther apart from each other than the whip stitch.

To create a blanket stictch  you will need to start the same way you did with the overcast but instead of creating a second overcast stitch place your needle under the first stitch on from right to left. Continue on this way, making an overcast stitch and ducking underneath it until your project is complete.

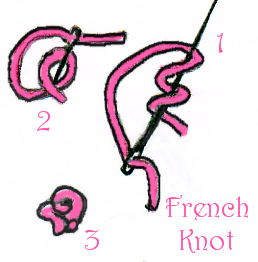
frenchknot

 French Knots

French knots are used to create seeds or dots on a piece, they take a bit of practice but look stunning when completed. The key to this method is to not pull the thread too tightly at the end. The knot should gently “sit” on top of the fabric.

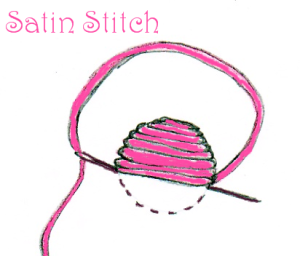
satinSatin Stitching

Satin stitching is used to fill in an area with thread this is rarely used for felt food but in some rare cases it is used to create text or shapes that are too small to be made of felt. Satin stitching couldn’t be any easier. since it is basically one wide running stitch repeated over and over again. The trick to sewing with a satin stitch is to first outline your shape with a back stitch so that your edges remain smooth, simply satin stitch over your outline and viola!

sewingaknotSewing a knot

The holy grail of sewing! Most of us learned this in home ec. This knot is essential for sewing felt food since this know doesn’t require you to pull the thread and the knot is nearly invisible.

1. Begin by creating a loop where you intend to end your peice and pass your needle through that loop then pull thread through.

2. You should have a completed knot however this is not strong enough to hold long term.

3. Repeat step one on top of your original knot for added strength, many people pass the needle though the body of the knot and then create their second loop and then continue passing the needle though the loop and pulling. I personally do it this way and find it makes for a very tight knot.  

 fudgedesserts


Gluing felt

Really you want to glue it? Are you sure you wouldn’t rather just put a few stitches in it or easier still needle felt it? No. OK then here goes, it seems that the easiest way to hold pieces of felt together is to glue them. However this can be tricky since most thin or water based glues like Elmer’s will just absorb into the felt this is especially true if you are working with wool or a high wool blended felt because of the loft. I really recommend not gluing your felt unless you absolutely have no choice since this will make the felt harder and more difficult to drape or sew. If you must glue you should  use hot glue  with caution, since you will most likely have a noticeable ridge where the hot glue was laid down, and it can be a bit messy. Also when working with acrylics use of a high temp glue gun can be dangerous since acrylic is a plastic and will melt. In all instances I recommend using Beacon’s felt glue it will work on the thinnest acrylic without soaking through and I have seen it hold felt pom poms in place very nicely, it dries 100% clear and has no yucky fumes. It’s very similar to Elmer’s glue but thicker and not named Elmer’s. 🙂

If you are making something for a child I would recommend gluing and running a few stitches through for safety and if you are beading something for a child I would really recommend gluing since over time felts can shift making threads longer and making beads more easily broken off and swallowed. If you cannot find Beacon’s felt glue my second choice would be tacky glue, and my third choice would be quitting and having a glass of wine instead.

Unique glue situations (never thought you’d see those words together huh?)

If you only want to glue down a felt piece to hold it for stitching I recommend using a glue stick just make sure your glue stick is soft and be prepared for it to be all “felty” after use.  THIS WILL NOT HOLD LONG TERM! In fact in some cases it may not hold at all. This is dependent on the humidity, your felt and how lucky you are. After gluing you will need to remove the felty part from your glue stick to avoid it being transferred onto your next glue stick project and you should try to wait for it to dry before attempting to sew or your needle may get gooky from passing through the glue stuck? sticked? stucked?  felt.

Glues can also be used to accent a piece as in the case of American Felt and Craft’s Hot Fudge Glue.

Other Options

You can also Needle Felt pieces together however that’s a long and detailed post for another day.

Last week: Needles                                                                                             Next week : Felt Food 101 Stuff it

Colored Hook and Loop! (non-velcro brand fastener) Now available!

13 Jun

chopchop

We just unloaded our stock of colored hook and loop! Sew matching hook and loop to felt food for fruits, veggies, and desserts that “chop” apart easily with a plastic play knife.

What more could your budding foodie ask for?

P.S Check back later this coming week for the totally free felt carrot tutorial!

constructionchopchop6