Tag Archives: free

Felt Avocado Tutorial and Pattern

12 Sep

DIY Felt Avocado

You asked for it you got it! A bunch of people asked for a felt avocado pattern so here it is. I love these squishy felt avocados and I am smitten by the removable pit. You may think I’m crazy but come on…

IMG_6085Seriously!! Felt avocado pattern - felt food

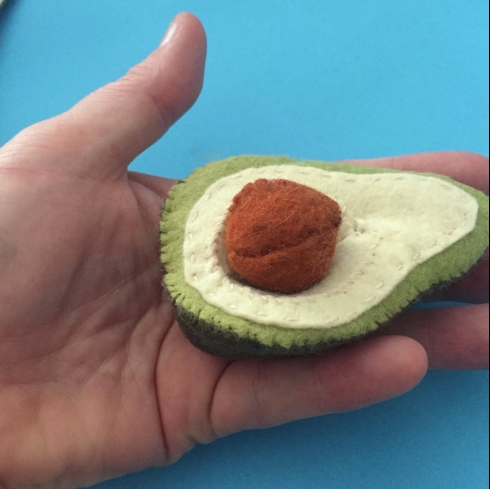
Sewing this fun felt food avo is much easier than it looks just follow our step-by-step photo tutorial and instructions. For even more felt food patterns, check out our tutorials for Broccoli and Cauliflower, Cut Apart Carrots and Fried Eggs. And keep up with us all September for felt food tutorials galore.

ywn

You will need:

5″ x 6″ Dark green felt for Avocado Rind, I used Courtyard but Sushi or Cactus would also work well* This will make one whole avocado or two halves.

4″ 6″ Muted Green felt for Avocado inside I used Granny Smith   

4″ x 4″ Pale yellow or green for Avocado center I used Buttercream but Irish cream or Chartreuse would also work well. *

2″ x 4″ Pit color I used Penny*

Scrap of Stem colored felt I used Chocolate *

Stuffing

Template (at the end of post)

Whole Avocado

DIY felt avocadoCut 6 peel pieces from dark green felt. Sew sides of two of the pieces together with matching thread and an overcast stitch repeat with all sides.

felt avocado rindSew sides together. Turn inside out and stuff.

felt avocado tutorial step by stepSew Closed.

felt cado

Sew round stem scrap to the top, you can also glue it in place with a fabric or felt glue. Felt pattern avocado

Felt Avocado Halves

IMG_6119

IMG_6053

Sew two center indents together along one of the curves using an over cast stitch. Stitch indent inside the hold in the center piece. IMG_6054

Repeat for other avocado center. Sew centers to the green base pieces using matching thread and a running stitch.

felt avocado halves

Set centers aside and sew avocado rinds by sewing three peel pieces together along the side with an overcast stitch as you did for the whole felt avocado.

feltavocado

Now it’s time to get ugly!

Place inner avocado on top of the rind with ugly stitches facing outward. (aka inside out)ugly avocado American Felt and CraftOvercast stitch along the outer edge leaving a 1″ space to turn the piece.

Turn the felt avocado the other way (right way aka pretty way) and stuff. IMG_6068Sew Closed. Repeat with other half

Make a pit.

pit

Sew all 4 pit pieces together along the rounded edges exactly the way you did for the center indent. Leave one side open, turn right side out, stuff and sew closed.

Felt Avocado

Felt Avocado Pattern

Happy Crafting!

~Andie

Felt Avocado Template- Print at full sizeFelt Avocado Templates

Hungry for more free felt food patterns?

Felt Cakes Tutorials

DIY mini felt pumpkin felt food tutorial

cover4

Pop by the shop:

American Felt and Craft - a unique online craft supply store.


Salt and Pepper’s here! Interactive felt salt and pepper shaker tutorial.

27 Aug

How to make Felt food - Salt and Pepper Shakers

Supplies to make felt food salt and pepper shakers

You will need:

1 sheet White felt & matching thread

1/2 sheet Grey felt- Grey Flannel

2 Rattle Inserts

Ric Rac – 1 yard Really Red

Red and Grey embroidery thread

Sewing and embroidery needles

Stuffing

Template – at the end of post

Cut

Cut shaker bodies and shaker bases from white felt.

Cut shaker rims and tops from grey felt

embroder felt salt and pepper

Lightly trace the letters onto the center of the shaker bodies with a pencil.

felt salt and pepper shakers

I am not skilled at embroidery so I fake it with short back stitches. The good news here is yours is bound to look WAY better than mine.

 Stitch out the letters I used 5 strands for the thick parts and 3 for the lighter lines.

Add dots onto the shaker tops with French knots and grey thread.

 DIY felt food salt and pepper shakers

Stitch shaker rims to the top of each shaker with grey thread and a running stitch.

Stitch red ric rac to the front of the shakers about 1/4 inch from the base.

felt food salt and pepper shaker

Turn shakers inside out and overcast stitch up the long edges with a sturdy white thread.

rattle toy from felt

Insert a large rattle into base of each shaker.

felt food salt and pepper

Sew base to shaker and turn right side up to settle rattle into the base.

stuff felt tutorial

Push stuffing into open top.

sew felt top

Sew shaker top to rim with an overcast stitch and grey thread.

Salt and Pepper Tutorial

Spice up your felt food!

Happy Crafting

Andie

IMG_20151206_160040 (1)

Thank’s Lisa!

Pop over to the shop:

Find the perfect shade of blue for your next project.

Free tutorials you might also enjoy:

Free Felt cut apart veggie tutorial from American Felt and Craft #FeltFood

DIY Seahorse hobby horse

Felt Food Cake Pops – Tutorial and Pattern

29 Jan

DIY Felt Cake Pops

CP22Get into the spring party mood with these fun felt food cake pops. They are a little tricky to master but once you get the hang of them the theme and decorating possibilities are endless.

DIY felt cake pops

These sweet felt cake pops make the prefect addition to your felt food bakery or teddy bear’s picnic.

Add some more fun to your felt project by poking a few holes onto crafter’s foam with a chopstick and slip the pops in for a fun and colorful felt food display.

You will need:

Per pop:

4.5″ square of felt in cake pop color, I used: Buttercream, Pink tutu, Mint, White, Chocolate, Aqua and Amethyst Purple*

3.5″ x 1.5″ white felt scrap for stick*

*Matching thread

Felt Glue

 (optional) 

Ribbon for base

Nut Beads

Classic Sprinkle Beads

Sugar Beads

Jimmies (sprinkle beads)

Felter’s Friend Freezer paper – Cutting accuracy is important here.

Felt Scrap for misc decor.

Template – at the bottom of post.

Cross stitching thread for sprinkles

Step 1:

 Cut out your cake pop and stick pieces, you may want to print or copy the pattern onto freezer paper for the most accurate cutting.

For tips on this see our post on Cutting Felt

Step 2:

stcurl

 Roll the white felt rectangle long between your hands to help it better curl. Roll up and stitch down the side with a running stitch and matching thread. Set aside.

Sew Up the stick

Step 3:

If you are embellishing with french knot sprinkles now is the best time to create them .

How to make a felt cake pop - felt foodShown right side out.

Sew the cake pop from the center hub down until you get to the flat bottom edge. Leave your knots exposed because you will be flipping the piece inside out.

How to sew felt food - cake pops American Felt and Craft

Repeat on 3 sides. Sewing it this way makes your piece a bit more uniform and is the best way to compensate for any small differences in cut.

Step 4:

American Felt and Craft free felt project tutorials

Sew all but one remaining side, flip piece so it is right side out and gently stuff. Sew up open side.

DIY felt food cake pop

Step 5:

Place stick piece into the center of the felt cake pop.

felt food patterns free

Run a small gathering stitch around the base of the pop and pull tightly, then pass the needle through the “stick” a few times to insure it is secure.

DIY felt toys

Step 6:

You may need to roll the “pop” between your hands to round it out.

Tie bow around the base and add sprinkles or other embellishments with felt glue or stitching.

Felt Cakes Tutorials

Click here for the Template : cakepopPDF

Hungry for more free felt food tutorials?

Easy Felt Food Petits Four (Tea party cake) tutorial and pattern.

Free Felt Cherry Pie tutorial and pattern

felt food chocolate cookie tutorial

Stop by the store for all your crafting supplies:

Felt from American Felt and Craft - over 140 colors!

Happy Crafting!

~Andie

Spooky Shadows DIY Halloween Felt Bean Bag Tutorial

3 Oct

Easy DIY halloween bean bag toss, just add pumpkin buckets!

Halloween is creeping up on us.  Wrangle up all your favorite goblins for a Halloween bean bag toss.

Halloween bean bag toss game with plastic pumpkins

These simple yet elegant bean bags are a great project for the beginning hand sewer.

Toss in some a few pumpkin trick or treat buckets and you’ve got yourself an easy Halloween party game for all ages!

You will need:

1 9″ x 12″ Embossed jack – lantern felt sheet

1 9″ x 12″ Orange felt sheet (Monarch Butterfly)

1 – 9″ x 12″ Black Felt sheet

1 cup of dried beans

Orange and black thread.

OPTIONAL: Plastic pumpkin trick or treat buckets.

Felt Bean Bags for halloween

Cut the orange and patterned felt sheets into 6 rectangles.

bean bag template

Cut 1 of each of the felt shadow shapes on template below out of black felt.

For tips on cutting small shapes see: Cutting Felt  or try Andie’s method

Cute felt bat bean bag

Sew down one of felt shadows to each of the orange rectangles.

Place printed felt rectangle on back with print facing outward.

How to make a felt bean bag, picture tutorial, great beginner project.

Using a running stitch sew around the outer edges, stopping to fill with about 2 tbsp of dried beans before closing bean bag.

Felt Bean bag tutorial - super easy.

Repeat with remaining squares.

Easy Halloween templates for felt bean bags - please do not pin templates.

Easy Halloween bean bags - prefect project for a beginning hand sewer!

Happy Crafting!

~Andie

American Felt and Craft online felt and craft store , over 100 colors of felt by the sheet! Ships worldwide.

Stop by the Shop

Other Free Tutorials You Might Enjoy:

DIY mini felt pumpkin felt food tutorial

DIY felt pumpkins

Pattern for fall trees candle mat

Scrappy Felt Candle Mat