

Teething rings are by far one of the easiest and most personalized gifts you can give. If you can string some beads you can make a teether, it’s really that simple.
Of course because these are given to small children there are a few safety precautions you will want to take but all in all these handmade teethers go together in just a few minutes and are shockingly strong. Follow our quick and easy tutorial to find out how to make piles of super strong, beautiful handmade teethers for your next event, craft fair or baby shower.
To begin you will need to know how many beads you need to make a teething ring and that depends on the size of the beads.
Silicone teething beads come in all sizes shapes etc but in the simple bead shape we carry 3 sizes. 19mm, 15mm and 10mm. We also carry decorative versions like bunnies, basketballs, mushrooms, succulents, letter and heart beads but for clarity we will leave those for another day. Be sure to use medical grade silicone beads made for teethers. These will be dishwasher, had wash and washing machine safe if they have no wood otherwise I would recommend a simple hand wash.


Above is the size difference between the beads. To make a 3″ ish inch circle you will need a 7.5″ ish string.
The smallest silicone teething bead we carry is the 10mm. Three small beads will give you one inch of string.
In the middle is the 15mm silicone teething bead, two of these will equal one inch.
The largest teething bead size we carry is the 19mm one and a half of these beads will give you one inch.
 To find out how many teething beads you will need for a teething ring simply add the numbers until you reach 7.5″ to 8″.
 Here they are pulled into circle.
Now let’s make teethers:


1. After beading your 2mm synthetic string to about 7.5″ pull the loose ends together as tightly as possible to form a ring. Add any teething pendants you are using. Pull very tightly and knot twice.
2. Cut leaving a small tail on either side.
3. Using a lighter burn both ends carefully push them together to permanently fuse the string.
Because this bond is so tight it should NEVER be used on anying large enough to fit around a child’s head or neck ect.
4. Work the melted knot area into the hole of one of the beads on either side of it pull until the knot gets stuck.
The tauntness of the ring will keep it from being exposed again. And further protect the knot by distributing any stress to the piece evenly.
Pull on the ring several times to make sure the bond is secure.

American Felt and Craft carries over 200 different teethers, wood teething beads, silicone beads and all kinds sizes, styles and colors. Which means you can make a nearly infinite number of different and unique pieces.
Below are 3 ideas to get you started.
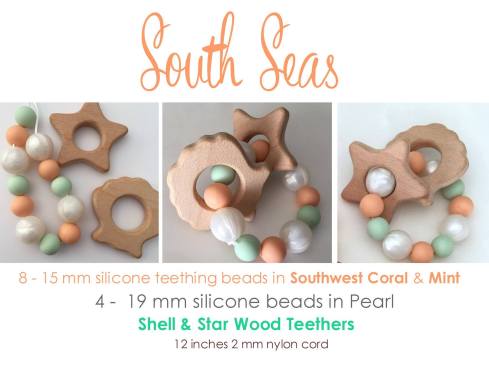 String silicone teething beads onto cord using pattern shown in the photo. Slide the shell and star wood teethers into place, pull together. Knot twice melt and tuck into place.

Add wooden teething beads to cord, slide crochet bead in center, slide turtle teether into place and add 2 small teething rings. Pull, knot twice and melt. Tuck not into bead.

String silicone teething beads onto cord using pattern shown in the photo. Slide the citrus and pineapple wood teether into place, pull together. Knot twice melt and tuck into place.
It’s so simple right?

Remember there are a few simple rules for making teething rings:
- Keep the circle tight. You don’t want little fingers to be able to get in between the beads and possibly pinch, you don’t what it to be super floppy or be able to be twisted around a wrist or any other small person part. Silicone beaded teethers will always be tighter because the small amount give to the beads allows them to be tied tighter than wood.
- Keep the circle small. The silicone teether shouldn’t be much bigger than a 2 or 3 inch circle when done. If you want to make a larger piece breakaways are required to prevent any possible strangulation hazard.
- Knot at the end of each side of the beads to secure pull ends together to form the ring and knot ends together…twice. You want 0 chance the knot is going to come loose.
- Melt and fuse cord. Use 2mm thick synthetic cord, anything larger is hard to bead with and anything smaller doesn’t hold the melt long enough without cooling to properly fuse. If you properly fuse the ends it should hold a minimum of 15 lbs of constant pull. AKA there is NO WAY it’s ever coming apart.
- Wiggle the fused knot into the beads. A good shimmy and a little finesse should allow the knot to wedge itself somewhere near the center of the bead, this keeps the knot from any baby teeth, improves the look and helps keep an even pressure on the knot.
- Give the piece a good tug to test before giving it to your child. Go ahead pull all you want it will should never ever break or budge no matter how hard you pull. It’s small size, round shape, tight beads, fused cord, not one but two knots one on top the other make it extremely strong. That should give you some understanding of the strength of this method and why it should never be used on larger pieces like necklaces. Give it a good tug, if it feels even slightly loose cut it apart and do it again.
That’s it!
Have some questions about teething beads or making teethers, let me know. I am always happy to help!
Happy Crafting – Andie
Stop by the shop:


Leave a Reply