Fight school break boredom with this fun felt ninja craft.
These felt ninja throwing stars are lightning fast to stitch up and a great way to teach hand sewing your karate kid.
A traditional throwing star has a hole in the center making it easy to string on a belt for transport. While you can easily add a hole in the center we think you’ll agree the ninja belt bag creates a far more adorable storage option.

Hai – Ya! Of course your stealthy ninja needs some place to put his felt weapons.
Kick it up a notch with ninja faced pouches featuring a front pocket for easy access to your felt throwing stars. Very helpful in the event your samurai is faced with a sudden attack. Or store them on your black belt in the pouch pocket keeping your weaponry secure during all the stealthiest of ninja maneuvers.
Ninja Throwing stars also make a great DIY ninja birthday party favor.
DIY Felt Ninja Throwing Stars
You will need for 6 stars:
2- 9″ x 12″ sheets grey wool blend felt (I used Grey Flannel)
Grey thread and sewing needle
Felter’s Freezer paper (Optional)
Templates at end of post.
As with most weapons precision is key when cutting the felt throwing stars, I cannot stress enough how helpful using Andie’s or the freezer paper methods for cutting out these pieces is.
To use felters freezer paper print out your shapes, cut them out to make the most of your felt, iron the shapes down.
Lay another piece of felt under the ironed on piece and cut out matching sets of throwing stars.
Carefully peel the paper free from your star and set aside (These can be reused at least 3 more times)
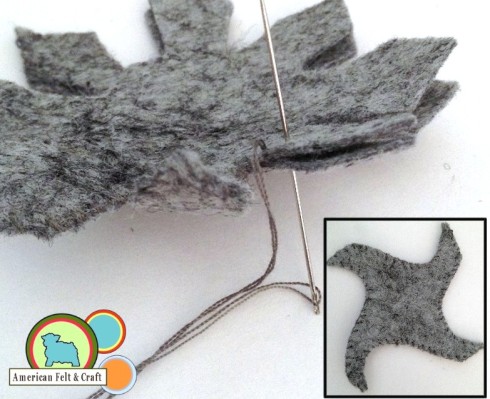
Overcast stitch along the edges with matching thread.
DIY Felt Ninja Pouches
Per Pouch you will need:
1- 9″ x 12″ black wool blend felt*
4″ x 3″ flesh colored felt, I used Bisque, Pastry and Toffee *
1 – 9″ x 12″ Ninja tie color, I used Pink Tutu, Egg Yolk, and Lipstick*
Matching Thread
Templates at end of post.
Cut out 2 pieces of template A from tie colored felt. Sew the centers together and fold in half.
Starting 1/2″ in sew long edges together leaving last 1/2″ open.
Set aside.
Cut one face piece from flesh tone felt (Template B)
Cut 2 felt pouches (Template C), 2 eyes (Template E) 1 corner piece (Template D) and 1 Belt Loop (Template F) from black felt.
Stitch face mask to one of the pouch sides (Template C pieces) with matching thread and a running stitch. Place eyes and stitch down with matching thread.
Attach triangle pocket (Template D) as shown on template using a running stitch and black thread.
Stack pouch sides so that the face is on one side and the belt loop on the other.
Fold over can cut small slits as shown on template.
Thread the colored tie through the holes.
Overcast stitch around the outside.
Leave the portion where the tie is exposed open.

Happy Crafting ~
Andie

Ninja Pouch Template
Ninja Star Templates
Stop by our shop:
Stealthy Felt Greys, Whites, and Blacks by the sheet.


I am so using this when I get the materials
Hi, I am wondering what is the finished size on the Ninja pouches? I am trying to get the templates to print and it is a bit large for my printer. Thanks for the info.
Try the fit to page option when printing. All patterns are sized to be printed on normal sized printer paper.
Thanks! R
On Thu, Nov 13, 2014 at 11:39 AM, American Felt and Craft- The Blog wrote:
> AmericanFeltandCraft commented: “Try the fit to page option when > printing. “
I hit the “fit to page” option as well, but the pattern still makes the pouch only about 3″x4″. Is this accurate?
Hello, I have them at about 4.75″ x 6.25″. I free handed them and then created my template from them. You should be able to make them at nearly any size since the sizes would increase or decrease as one. I wouldn’t make them any smaller than my measurements above though otherwise it would be too hard to reach into. Hope this helps
Andie